
Care Center
A little understanding.
A happier plant.
Start with your space, then get to know your plant. Find practical answers below, scan your plant’s QR code for its specific care, or ask Nick when you need another pair of eyes.
What’s happening with your plant?
Choose a question for a short checklist. A symptom can have several causes—check conditions before treating.
Yellow leaves
- Notice whether one older leaf or several leaves are changing.
- Check moisture and drainage before adding water.
- Note recent changes in light, temperature, watering, or repotting.
- Take a whole-plant photo and a close-up of the affected leaves.
Brown tips or patches
- Note when the damage appeared and whether it is spreading.
- Review watering consistency and any recent fertilizer use.
- Check for new direct sun, cold exposure, or a recent move.
- Photograph both sides of affected leaves.
Pests, webbing, or sticky leaves
- Keep the suspect plant apart from your collection.
- Inspect leaf undersides, stems, and leaf joints.
- Photograph insects, webbing, or unusual marks before treating.
- Include any recent treatments when you ask for help.
Watering questions
- Find your plant’s specific care guide.
- Check the medium and pot weight rather than watering automatically.
- Check drainage and whether water is collecting in the outer pot.
- Record when you last watered and how quickly the medium dries.
My new plant arrived
- Unpack carefully and inspect your plant.
- Check moisture and choose a suitable place for its light needs.
- Monitor it separately from your existing collection.
- Avoid changing the pot, medium, light, and fertilizer all at once.
Need another pair of eyes? Send Nick photos and your care routine. Replies within 36 hours.
Explore care topics
Light & placement
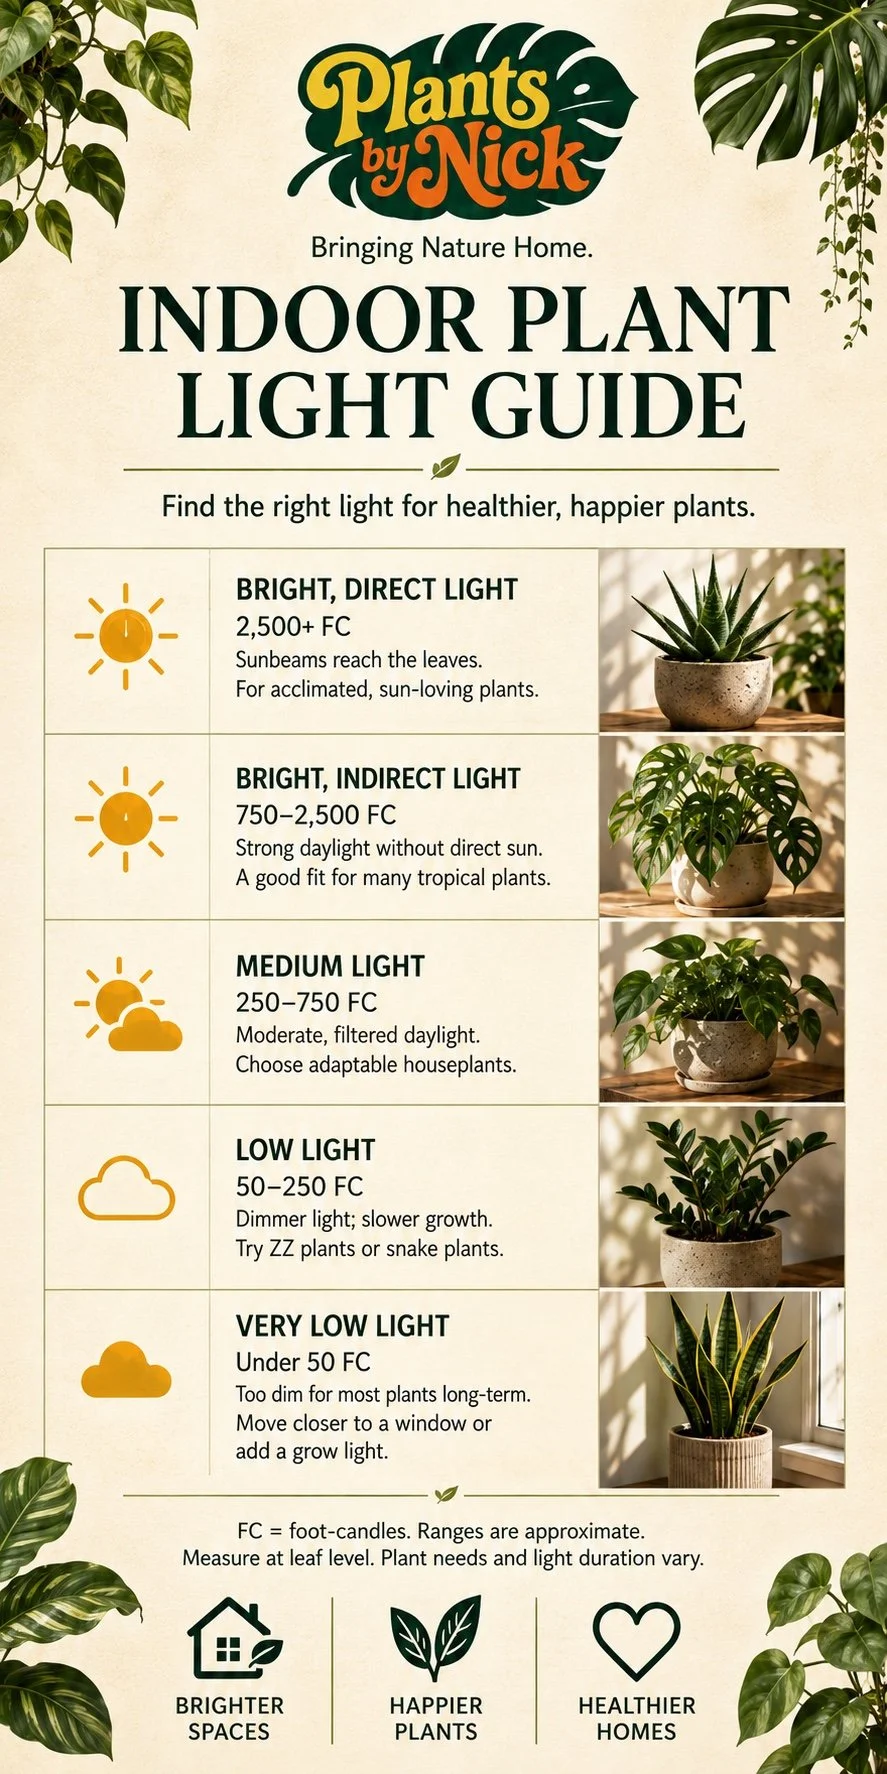
Which window?
In a Northern Hemisphere home, north generally offers gentler light, east morning sun, south the strongest sustained sun, and west warm afternoon sun. Trees, buildings, curtains, and seasons can change that picture. Use your plant’s care summary to choose a starting point.
Bright indirect light & distance
Choose a bright location where strong sun does not fall directly on the leaves for long periods. A sheer curtain can soften direct light. There is no distance that works in every room: a spot that looks bright to you may be too dim for a plant far from the window. Check at different times of day. Stretching or smaller new leaves can signal insufficient light. Increase light gradually.
Grow lights
Use a light intended to support plant growth and follow its recommended coverage and distance. A timer helps consistency. Keep a daily dark period; more hours cannot always compensate for weak light.
Watering
Check, then water
Use a reminder to check rather than automatically water. Feel the medium and compare the pot’s weight with how it feels after watering. A fern, cactus, and carnivorous plant need different drying points. Start with the QR guide.
For most potted houseplants, water thoroughly and let excess drain. Empty the saucer or decorative outer pot. Do not leave roots standing in water unless the plant’s growing method calls for it.
Bottom watering
When appropriate for the plant and mix, let the medium absorb water through the drainage holes, then remove the pot and drain. Avoid leaving it soaking indefinitely. Occasional watering from the top can help flush accumulated salts.
Water quality
Some plants are sensitive to dissolved minerals. Carnivorous plants often need rainwater, distilled water, or suitable reverse-osmosis water. Follow their specific guide.
Soil & repotting
A new home is not, by itself, a reason to repot. Check for crowded roots, unusually fast drying, damaged containers, or deteriorated growing medium. If needed, choose a modest size increase and a pot with drainage.
Choose a suitable mix
Match moisture retention and airflow to the plant. Many aroids benefit from an airy mix that holds some moisture; cacti and succulents generally need faster drainage. Ferns often need more even moisture. Carnivorous plants require suitable low-nutrient media.
LECA, PON & semi-hydro
Changing the growing system changes watering and feeding too. Do not transfer a stressed new arrival simply to try a different medium. Ask Nick about your plant and setup first.
Fertilizer, temperature & humidity
Feed according to the plant, its active growth, and the fertilizer label. Fertilizer does not replace adequate light and is not a first response to a struggling plant. Check whether fresh potting mix already contains fertilizer.
Keep plants away from heating vents, air-conditioning blasts, and cold glass. For plants that need humid air, use a measured approach such as a hygrometer and a maintained humidifier. Good airflow still matters; persistent wet leaves and enclosed, stagnant air are not the goal.
New plant care
Give your plant a calm start: unpack carefully, inspect it, check moisture, and choose a suitable spot. Keep new arrivals apart from your collection while monitoring them. Avoid changing light, pot, soil, and fertilizer all at once.
Pest help
Start with identification. Check both sides of leaves, stems, leaf joints, and the potting surface. Separate a suspect plant and photograph what you see before treating.
- Spider mites: fine stippling and webbing can be clues.
- Mealybugs: cottony white patches often hide at leaf joints.
- Scale: raised, attached bumps may appear on stems or leaves.
- Thrips: tiny narrow insects, scarring, or dark specks deserve a closer look.
- Fungus gnats: small flies around the mix suggest checking moisture and drainage.
These clues are not a diagnosis. Physical removal or washing may help mild infestations when the plant tolerates it. Use treatments labeled for the identified pest, plant, and indoor use. Follow the label; do not combine treatments at random. For beneficial insects, check the target pest and compatibility with recent treatments.
What the leaves are telling you
One symptom can have several causes. Check conditions before choosing a fix.
- Yellow leaves: check moisture, drainage, recent moves, and whether only an older leaf is affected.
- Drooping or curling: check whether the mix is wet or dry, temperature, and recent changes.
- Brown tips: check watering consistency, salt buildup, and humidity needs.
- Brown or bleached patches: check direct sun, cold exposure, pests, and whether damage is spreading.
- Leaf loss or slow growth: check light, season, roots, and recent shipping or repotting.
Do not assume drooping always means thirst. Photograph the plant and note what changed. Ask for help if damage spreads or stems become soft.
Plants & pets
Check the exact plant identity and animal involved. “Pet-friendly” does not mean a plant is food; chewing any plant can cause stomach upset. Keep fertilizer and pest treatments out of reach too.
For a possible ingestion, contact your veterinarian promptly rather than waiting for a Plant Doctor reply.
Still unsure? Ask Nick.
Send photos of the whole plant, the affected area, and the pot or growing medium. Include your window direction, distance from the window, watering routine, and recent changes.
Does something look different?
A symptom can have several causes. Start with these checks, then send Nick photos and your care routine. Use these visual clues as prompts to investigate, not a diagnosis.
Drooping leaves
Check the growing medium before adding water. Is it dry, or still wet? Check drainage and compare with your plant’s care guide.
Ask Nick about this →Yellow leaves
Notice whether one older leaf or several leaves are changing. Check moisture, light, and recent changes before choosing a treatment.
Ask Nick about this →Brown patches or tips
Note when marks appeared and any recent move, direct sun, repotting, or fertilizer. Photograph the whole plant and a close-up.
Ask Nick about this →Webbing or sticky leaves
Keep the plant apart from your collection while inspecting leaf undersides and stems. Send clear close-ups for help identifying what you see.
Ask Nick about this →Need hands-on help? Explore repotting and plant care services.